There are a variety of options for workflow between RISA and Revit. Before using the RISA-Revit Link it is best to understand what these are, and how they can best be used for your project.
The RISA-Revit Link encompasses four programs (RISA-3D, RISAFloor, RISAFoundation, and Revit). Each program has its own purpose, but all four fully integrate for one complete building design. The reasons for starting in each program are listed below:
This is the most common workflow. Remember that the goal of the Revit model is to represent the physical model as accurately as possible, whereas the goal of the RISA model is to represent the analytical model as accurately as possible. There are many circumstances where physical arrangements are better represented in different ways from each other.
A Revit model may have a very complex physical arrangement that can be greatly simplified for structural analysis. By starting in Revit you can model these physical complexities, and assign an analytical arrangement for RISA to use. If you instead start in RISA, the link will create members in Revit, but it will create them with the most basic physical geometry, since it does not know your intentions for details.
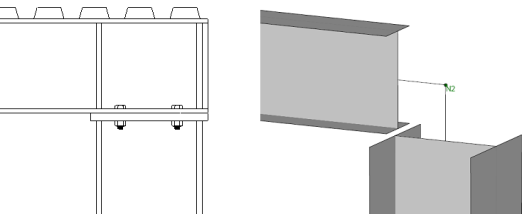
Take the detail shown below for example. On the left is the Revit representation of a column and beam. On the right is the RISA representation. The connection details shown in Revit are necessary for construction drawings, however in RISA a simple 'fixed' connection is sufficient to give an accurate analysis.
A proficient Revit user can assemble a structure in Revit as fast as a proficient RISA user can assemble a structure in RISA. Therefore, especially if the architect has already started a Revit model, it may be fastest to generate a model first in Revit which uses the architect's model as a template.
Be aware that your Revit model must be in good condition prior to exporting to RISA. This means that the analytical model especially should be thoroughly reviewed to ensure that all elements properly connect to each other. A messy Revit model will create a messy RISA model full of instabilities.
Prior versions of Revit 2023 automatically creates an analytical model based on the physical model (elements drawn in Revit). However, Revit 2023 requires the user to create an analytical model after drawing the physical members. A blank model will be created in RISA if no analytical model is present in the Revit model. Steps are provided below to create an analytical model using the "Analytical Automation" tool within Revit.
Open the "Analytical Automation" tool under the "Analyze" tab in Revit as shown below:

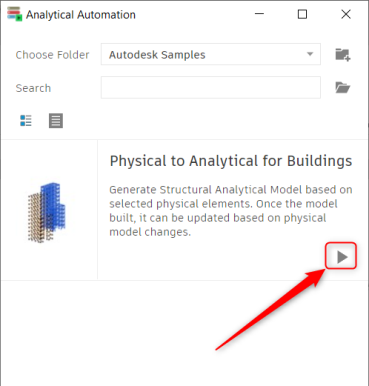
Click on the arrow as shown below in the "Physical to Analytical for Buildings" box.
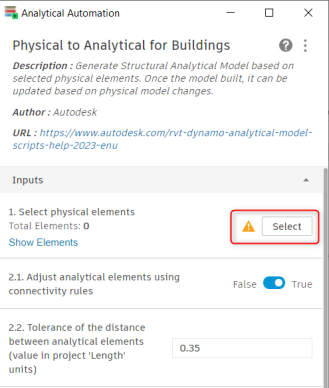
In the next dialog box, the user will be prompted to select the physical model within Revit.
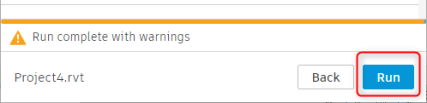
Upon highlighting and selecting the physical model in Revit, click on the "Run" button.
Once the analytical model is created, the user can simply close out of the "Analytical Automation" tool dialog box to return to the Revit model.
Verify that the analytical model is correct and then continue to proceed to use the RISA-Revit Link to export the model to RISA.
This is the second most common workflow. RISAFloor and Revit are very similar in their scope, in that they are both designed around building-type structures which have floors, roofs, and gridlines. This is as opposed to industrial structures which do not fit this profile. Most users who start in RISAFloor do so for the following reasons:
There are many users who prefer to start the model in RISAFloor, just be aware that after importing to Revit for the first time your Revit model may need some massaging in order to be ready for construction documentation.
Any RISA-3D elements that are present in the RISAFloor model (from RISAFloor-3D integration) will automatically be transferred over to Revit.
It is less common that RISA-3D and Revit would be linked together without also using RISAFloor. While RISA-3D does link with Revit, it is not constrained by some of the limitations that both Revit and RISAFloor have with regards to structure type. Revit is a Building Information Modeling program, so some structures which RISA-3D is well suited for (tanks, bridges, oil platforms, etc) do not fit Revit's mold of clearly defined floor levels and grids. Since the creation of RISAFloor, and due to its complete integration with RISA-3D, it is rare that RISA-3D is used on its own for building modeling purposes.
Whenever a RISA model is imported to Revit for the first time, or vice versa, a link is formed between the elements. This link is maintained by the Exchange File, which handles all of the bookkeeping between the two models. For this reason it is important to always use the same Exchange File when transferring back and forth multiple times (round-tripping). Whenever an Exchange File is exported and "overwrites" a previous version of the exchange file, it is actually a "merge" of new data into the existing exchange file.
The exchange file maps RISA element ID's with Revit element ID's. For example, a beam in the RISA model with the label M16 may be represented as a Revit beam with BIM ID #949. The Exchange File maintains a relationship between M16 and BIM ID #949 in order to track changes and map them between the two programs.
Whenever a Revit model is exported to RISA, the Link performs a sophisticated comparison using the Revit model and the Exchange File to determine what has changed between the Revit model as it currently exists, and what was imported from RISA during the last RISA to Revit import. This optimizes the export process and prevents the Link from making unintended modifications to existing RISA elements, resulting in much faster transfers if few changes were made within the Revit model.
Certain RISA properties are not mapped to Revit, such as unbraced lengths. These properties are not modified by the RISA-Revit Link, so they will always remain as whatever they have been set to in RISA.
Whenever a RISA model is imported to Revit, the Link performs a sophisticated comparison using the RISA model and the Exchange File to determine what has changed between the RISA model as it currently exists, and what was exported from Revit during the last Revit to RISA export. Certain element properties which are associated with a "solution" in RISA are always transferred into Revit regardless. These include:
With other element properties such as a beam's location or material, the Link performs a sophisticated comparison using the RISA model and the Exchange File to determine what has changed between the RISA model as it currently exists, and what was exported to RISA during the last Revit to RISA export. This optimizes the import process and prevents the Link from making unintended modifications to existing Revit elements, resulting in much faster transfers if few changes were made within the RISA model.
The Import from RISA dialog box contains an option to update only the member sizes and wood wall parameters. This forces the Link to ignore any changes to element geometry (such as the location of a beam or the slope of a roof).
The primary reason for using this option is when a discrepancy in geometry between both models ought to be maintained. These circumstances have become rare since the analytical adjustment tools in Revit have been improved. However, there may be circumstances where it is necessary within a RISA model to create "Dummy Members" which should not be transferred to the Revit model, and this option will prevent those members from being imported into the Revit model.
The examples below can help illustrate typical workflow and Link behavior in a way that is easy to understand.
A typical workflow process can be easily understood from the example below:
A typical workflow process can be easily understood from the example below:
The Link's behavior when dealing with changes to models is illustrated in the example below. Assume for this example that the model has already completed a successful roundtrip such as those illustrated in Example A or Example B, and that all of the members have been initially sized in both the RISA and Revit models:
The link therefore supports concurrent work to be done on both models as described above, so long as the RISA user and the Revit user are not working on the same element at the same time. If the penthouse addition in Step 4 would have affected anything the columns from Step 6 then the Link would have changed the affected RISA elements to match the Revit model (since the Revit model was being exported to RISA and not the other way around).
Occasionally a lack of communication between multiple people working on a given model can lead to unintended mistakes. For this reason the RISA-Revit Link always creates a backup of the entire project (RISA and Revit files) immediately before any import or export operations. Whenever importing or exporting, save your Revit model first. Then, before any import or export operation is performed an ImportBackup or ExportBackup folder will be created in the same location as your Revit model. This folder contains your entire project in the state it was in immediately prior to importing/exporting. If anything goes wrong with your Revit or RISA models you can delete the current versions and retrieve the prior versions from the ImportBackup or ExportBackup folder, depending on whether you were importing to or exporting from Revit.